AI绘画需要强大的数据和算力支持,只有经过良好训练的算法和数据集才能创造出卓越作品。然而,这对于想探索AI绘画的人来说门槛较高。直到我发现了腾讯云的AI绘图产品,开通送500张,用完后购买1000张也不到30,使用一圈后觉得还挺不错的。以前自己用sd搭建费时费钱,折腾环境和锻炼的耗时不说,高峰期任务量大服务器性能不足、低谷期没任务服务器在那干费钱。现在好多了,直接可以不用GPU服务器一台轻量搞定,不管高峰低谷出图时间都很稳定,而且灵活性增加成本大大降低。 结合EdgeOne边缘函数,通过靠近用户的边缘节点运行AI绘图调用程序,不仅省去了服务器,还可提升访问速度。 ## 开通AI绘画 进入[AI绘画控制台](https://console.cloud.tencent.com/aiart/text-to-image?from=20421&from_column=20421),点击立即开通。  开通后会赠送500次免费额度,新购的话目前有活动, 例如我下面这1000张就是在[这个](https://cloud.tencent.com/act/pro/AIhuihua?from=20421&from_column=20421)活动买的: 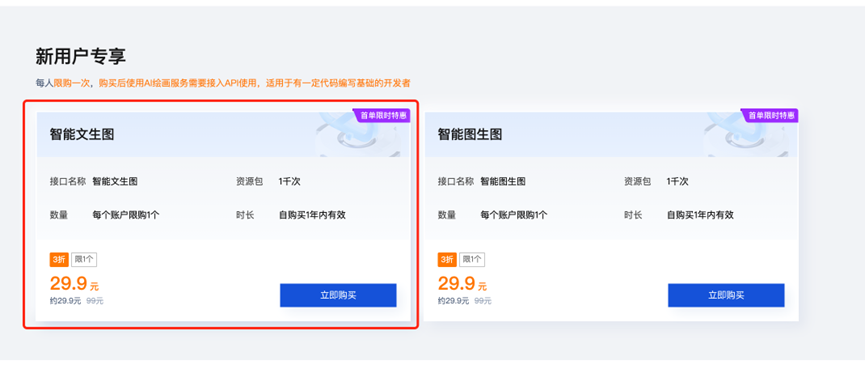 29.9能买1000张,一张不到3分钱,还是特别划算的。 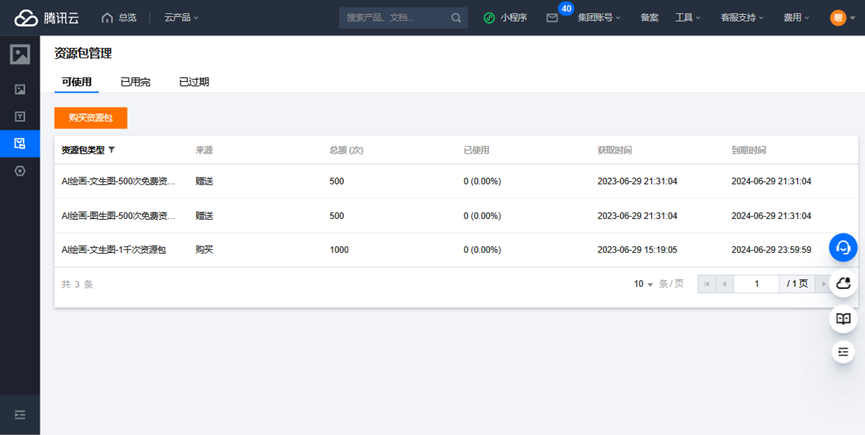 ## 获取API密钥 进入[API密钥管理](https://console.cloud.tencent.com/cam/capi?from=20421&from_column=20421),新建密钥 然后点击生成的密钥右侧的显示按钮,用管理员微信扫码。 记下现在获取到的SecretId和SecretKey 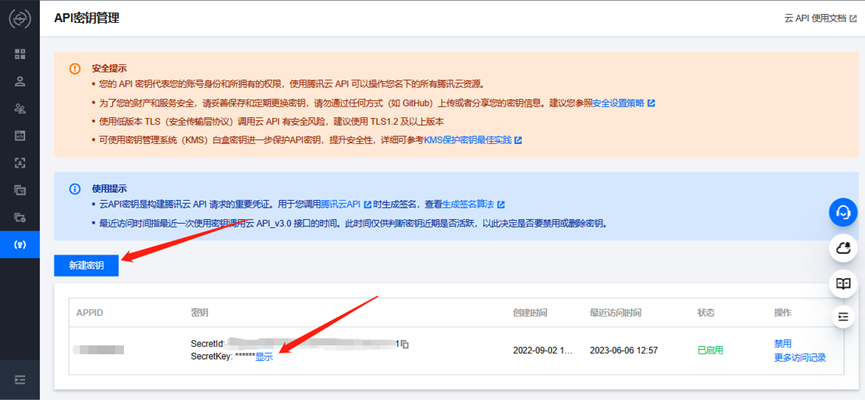 ## 了解腾讯云API调用过程与AI绘画相关文档 调用分4步: 1. 组合请求参数 2. 使用API密钥对请求进行签名 3. 将签名结果附加到请求头中 4. 发送请求 AI绘画API文档链接:[https://cloud.tencent.com/document/api/1668/88064](https://cloud.tencent.com/document/api/1668/88064?from=20421&from_column=20421) 以下是总结表格 | 参数名 | 参数位置 | 格式与说明 | 示例 | | ---------------- | ------------ | ------------------------------------ | ------------------------------- | | Action | 请求头 | String,固定值 | TextToImage | | Version | 请求头 | String,固定值 | 2022-12-29 | | Region | 请求头 | String,地域 | ap-guangdong | | Prompt | 请求体JSON | String,绘图描述 | 蓝天白云,草地牛羊 | | NegativePrompt | 请求体JSON | String,反向描述 | 山川 | | Styles | 请求体JSON | 数组类型,绘画风格 | [“103”] | | ResultConfig | 请求体JSON | 字典类型,结果配置(例如图片大小) | {“Resolution”:”768:1024”} | ## 编写EdgeOne边缘函数 完整代码如下: 修改位置有3处: 1. 上面获取到的API密钥SecretId 2. 上面获取到的API密钥SecretKey 3. 访问密钥acckey,为避免他人未授权调用,请勿为空 ``` // 将字符串编码为ArrayBuffer function stringToArrayBuffer(str) { const encoder = new TextEncoder(); return encoder.encode(str); } // 将ArrayBuffer转换为十六进制字符串 function arrayBufferToHexString(arrayBuffer) { const byteArray = new Uint8Array(arrayBuffer); const hexCodes = [...byteArray].map(value => value.toString(16).padStart(2, '0')); return hexCodes.join(''); } async function hmacSHA256(key, data) { const importedKey = await crypto.subtle.importKey( 'raw', key, { name: 'HMAC', hash: 'SHA-256' }, false, ['sign'] ); const msgBuffer = stringToArrayBuffer(data); const signatureBuffer = await crypto.subtle.sign('HMAC', importedKey, msgBuffer); return signatureBuffer; } function uint8ArrayToHex(array) { return Array.from(array).map(byte => byte.toString(16).padStart(2, '0')).join(''); } // 签名算法 async function qcloud_v3_post(SecretId,SecretKey,Service,bodyString,headersOper) { const HTTPRequestMethod = "POST" const CanonicalURI = "/" const CanonicalQueryString = "" // 将 JSON 对象中的键按 ASCII 升序进行排序 let sortedheadersOper = Object.keys(headersOper).filter(key => (key.toLowerCase() !== "x-tc-version")).sort(); // 遍历排序后的键并拼接 let SignedHeaders = sortedheadersOper.map(key => key.toLowerCase()).join(";"); let CanonicalHeaders = sortedheadersOper.map(key => key.toLowerCase() + ":" + headersOper[key].toLowerCase()).join("\n"); CanonicalHeaders = CanonicalHeaders + "\n" let HashedRequestPayload = await sha256(bodyString) const CanonicalRequest = HTTPRequestMethod + '\n' + CanonicalURI + '\n' + CanonicalQueryString + '\n' + CanonicalHeaders + '\n' + SignedHeaders + '\n' + HashedRequestPayload const currentDate = new Date(); const year = currentDate.getUTCFullYear(); const month = (currentDate.getUTCMonth() + 1).toString().padStart(2, '0'); const day = currentDate.getUTCDate().toString().padStart(2, '0'); const formattedDate = `${year}-${month}-${day}`; const Algorithm = "TC3-HMAC-SHA256" // 获取当前秒级时间戳 const RequestTimestamp = Math.floor(Date.now() / 1000).toString(); // const RequestTimestamp = "1688025007" const CredentialScope = formattedDate + "/" + Service + "/tc3_request" const HashedCanonicalRequest = await sha256(CanonicalRequest) const StringToSign = Algorithm + '\n' + RequestTimestamp + '\n' + CredentialScope + '\n' + HashedCanonicalRequest const SecretDate = await hmacSHA256(new Uint8Array([...stringToArrayBuffer("TC3"), ...new Uint8Array(SecretKey)]), formattedDate); const SecretService = await hmacSHA256(SecretDate, Service); const SecretSigning = await hmacSHA256(SecretService, "tc3_request"); const Signature = arrayBufferToHexString(await hmacSHA256(SecretSigning, StringToSign)); const Authorization = Algorithm + ' ' + 'Credential=' + SecretId + '/' + CredentialScope + ', ' + 'SignedHeaders=' + SignedHeaders + ', ' + 'Signature=' + Signature headersOper["X-TC-Timestamp"] = RequestTimestamp; headersOper["Authorization"] = Authorization; return headersOper } // sha256 签名摘要 async function sha256(message) { const msgBuffer = new TextEncoder().encode(message); const hashBuffer = await crypto.subtle.digest('SHA-256', msgBuffer); return uint8ArrayToHex(new Uint8Array(hashBuffer)); } // 密钥填写位置 const SecretId = ""; const SecretKey = stringToArrayBuffer(""); const Service = "aiart"; // 访问密钥设置处 const acckey = "," async function handleRequest(request) { const json = await request.json() const text2imgjson = {} if(json.Acckey !== acckey){ return new Response(JSON.stringify({"code":1,"msg":"密钥错误"}, null, 2), { headers: { 'Content-Type': 'application/json', 'Access-Control-Allow-Headers': 'Content-Type', 'Access-Control-Allow-Methods': 'POST, OPTIONS', 'Access-Control-Max-Age': '86400', 'Access-Control-Allow-Origin': '*' }, status: 200 }) } text2imgjson["Prompt"] = json.Prompt if(json.NegativePrompt !== ""){ text2imgjson["NegativePrompt"] = json.NegativePrompt } if(json.Styles !== ""){ text2imgjson["Styles"] = [json.Styles] } if(json.Size !== ""){ text2imgjson["ResultConfig"] = {"Resolution":json.Size} } const headersPending = { 'Host': 'aiart.tencentcloudapi.com', 'Content-Type': 'application/json', 'X-TC-Action': 'TextToImage', 'X-TC-Version': '2022-12-29', 'X-TC-Region': 'ap-guangzhou', }; const bodyString = JSON.stringify(text2imgjson) const headers = await qcloud_v3_post(SecretId,SecretKey,Service,bodyString,headersPending) const url1 = 'https://aiart.tencentcloudapi.com/'; let qcloud_api_data; await fetch(url1, { method: 'POST', headers: headers, body: bodyString }) .then(response => response.json()) .then(data => qcloud_api_data = data) .catch(error => qcloud_api_data = error); let ResponseData = {}; if(qcloud_api_data["Response"]["Error"] === undefined){ ResponseData["code"] = 0; ResponseData["image"] = "data:image/jpg;base64," + qcloud_api_data["Response"]["ResultImage"] }else{ ResponseData["code"] = 1; ResponseData["msg"] = qcloud_api_data["Response"]["Error"]["Message"] ResponseData["RequestId"] = qcloud_api_data["Response"]["RequestId"] } return new Response(JSON.stringify(ResponseData, null, 2), { headers: { 'Content-Type': 'application/json', 'Access-Control-Allow-Headers': 'Content-Type', 'Access-Control-Allow-Methods': 'POST, OPTIONS', 'Access-Control-Max-Age': '86400', 'Access-Control-Allow-Origin': '*' }, status: 200 }) } // 处理预检 async function handleOptions(request) { const headers = { 'Access-Control-Allow-Headers': 'Content-Type', 'Access-Control-Allow-Methods': 'POST, OPTIONS', 'Access-Control-Max-Age': '86400', 'Access-Control-Allow-Origin': '*' } return new Response(null, { headers: headers }) } addEventListener('fetch', (event) => { if (event.request.method === 'OPTIONS') { event.respondWith(handleOptions(event.request)) } else { event.respondWith(handleRequest(event.request)) } }); ``` ## 前端代码 效果图展示: 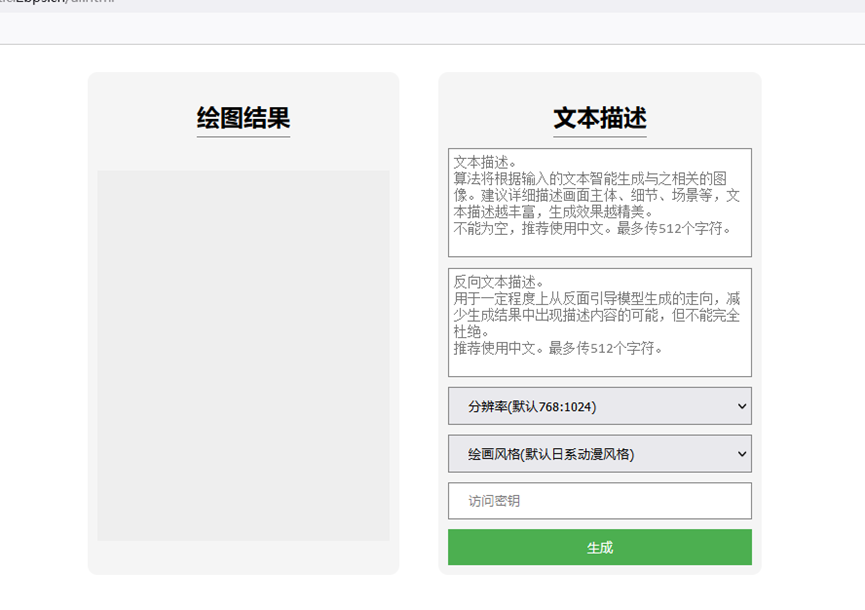 源码: 记得替换api网址 ``` <!DOCTYPE html> <html lang="en"> <head> <meta charset="UTF-8"> <meta name="viewport" content="width=device-width, initial-scale=1.0"> <title>AI绘图</title> <style> body { font-family: Arial, sans-serif; } .container { display: flex; justify-content: center; } .box { margin: 20px; border: none; /* 移除框的边框 */ padding: 10px; background-color: #f5f5f5; /* 设置框的背景颜色 */ border-radius: 10px; /* 添加圆角 */ display: flex; /* 使用flex布局 */ flex-direction: column; /* 垂直布局 */ align-items: center; /* 居中对齐 */ text-align: center; /* 文字居中对齐 */ } .box:nth-child(2) { align-self: start; /* 右边的box顶部对齐 */ } .box-title { margin-bottom: 10px; border-bottom: 1px solid grey; /* 添加标题底部的分隔线 */ padding-bottom: 5px; /* 添加一些底部间距以增强视觉效果 */ } #image-container { width: 300px; height: 380px; background-color: #eee; margin: auto; /* 在父元素中水平居中 */ background-image: none; } #text-description { width: 300px; height: 100px; margin-bottom: 10px; border: 1px solid grey; /* 添加外边框 */ padding: 5px; resize: none; /* 禁止调整大小 */ font-size: 14px; outline: none; /* 移除输入框默认的外边框 */ border-radius: 0; /* 移除圆角 */ } #text-description2 { width: 300px; height: 100px; margin-bottom: 10px; border: 1px solid grey; /* 添加外边框 */ padding: 5px; resize: none; /* 禁止调整大小 */ font-size: 14px; outline: none; /* 移除输入框默认的外边框 */ border-radius: 0; /* 移除圆角 */ } #dropdown { padding: 10px 20px; /* 增大按钮的内边距 */ cursor: pointer; margin-bottom: 10px; border: 1px solid grey; /* 添加外边框 */ width: 100%; /* 将宽度设置为100%以与容器对齐 */ align-self: flex-start; /* 按钮左对齐 */ } #dropdown2 { padding: 10px 20px; /* 增大按钮的内边距 */ cursor: pointer; margin-bottom: 10px; border: 1px solid grey; /* 添加外边框 */ width: 100%; /* 将宽度设置为100%以与容器对齐 */ align-self: flex-start; /* 按钮左对齐 */ } #acckey { padding: 10px 20px; /* 增大按钮的内边距 */ cursor: pointer; margin-bottom: 10px; border: 1px solid grey; /* 添加外边框 */ width: 100%; /* 将宽度设置为100%以与容器对齐 */ align-self: stretch; /* 按钮左对齐 */ } #input-container { flex-grow: 1; display: flex; flex-direction: column; /* 垂直布局 */ align-items: center; /* 居中对齐 */ } #text-input { width: 300px; height: 30px; margin-bottom: 10px; } #generate-button { padding: 10px 20px; /* 增大按钮的内边距 */ background-color: #4caf50; color: white; border: none; cursor: pointer; width: 100%; /* 将宽度设置为100%以与容器对齐 */ align-self: flex-start; /* 按钮左对齐 */ } @media (max-width: 600px) { .container { flex-wrap: wrap; /* 在屏幕宽度不足时换行显示 */ } .box { width: 100%; /* 让框占满一行 */ margin-bottom: 20px; /* 添加底边距 */ } } </style> </head> <body> <div class="container"> <div class="box"> <h2 class="box-title">绘图结果</h2> <div id="image-container"></div> </div> <div class="box"> <h2 class="box-title">文本描述</h2> <div id="input-container"> <textarea id="text-description" title="文本描述" placeholder="文本描述。 算法将根据输入的文本智能生成与之相关的图像。建议详细描述画面主体、细节、场景等,文本描述越丰富,生成效果越精美。 不能为空,推荐使用中文。最多传512个字符。"> 分辨率(默认768:1024) 768:768 1024:768 绘画风格(默认日系动漫风格) 怪兽风格 游戏卡通手绘 水墨画 概念艺术 油画 水彩画 厚涂风格 插图 剪纸风格 印象派 2.5D人像 肖像画 黑白素描画 赛博朋克 科幻风格 不限定风格 生成